The ShoWorks Lite Edition license allows for installation on 1 computer for
the same fair and 4 computers for the Standard and Large Fair Editions.
Additional licenses can be purchased. ShoWorks allows for unlimited
installations for fairs using the Enterprise Edition. Changes can be made on
multiple computers at the same time with or without a network or synchronizing
data.
This article is divided into 2 parts. Part 1 for your data (records)
and Part 2 for reports.
Part 1 - your data file (records)
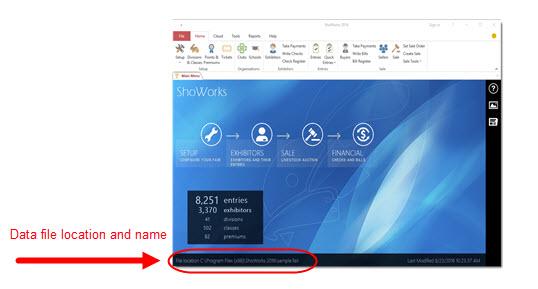
Tip: Your data file name and location can be found in the title bar
at the bottom of the ShoWorks main menu.
The following 3 methods apply:
Method A - If using network:
- Install ShoWorks on each computer and ensure each is running the
current/latest version by selecting Help > About ShoWorks. The version
number (such as 20.4.1) will be displayed. Check this number against the
updates page at
http://fairsoftware.com/updates .
- Open ShoWorks and if you have not already created your own data file, do
so by choosing the File
 , then New Data File or choose
an existing data file and choose a shared location (that is visible on the
network to all other computers).
, then New Data File or choose
an existing data file and choose a shared location (that is visible on the
network to all other computers).
- Ensure that this file and location have the proper read/write
permissions (check your Windows documentation on file/folder permissions for
more information on sharing).
- On each computer that has ShoWorks installed, open this shared file by
either double-clicking on it or selecting File ,
then Open Data File.
- Operate ShoWorks and note that changes from other computers are visible.
Notes about networking ShoWorks:
- Opening a file across a network when it is in use may take a while
and may take up to 1 minute depending on your network speed.
- If there are other ShoWorks users on the
network, they all should EXIT TO THE MAIN MENU BEFORE you attempt to
open ShoWorks. Not doing so will dramatically increase the load time of
ShoWorks. It is important to remember this if you are using ShoWorks on
a network.
- ShoWorks should not be networked on systems using less than 100Mbps
speeds and IS NOT supported over wireless networks.
- More information on speed issues while using ShoWorks on a network
can be found in the help article:
http://fairsoftware.com/articledetail.aspx?AID=117030
Method B - If not using a network and not using more than one
computer at a time (simply moving from one computer to another):
- Install ShoWorks on each computer and ensure each is running the
current/latest version by selecting Help > About ShoWorks. The version
number (such as 20.4.1) will be displayed. Check this number against the
updates page at
http://fairsoftware.com/updates .
- Open ShoWorks and if you have not already created your own data file, do
so by choosing the File , then New Data File or choose
an existing data file.
- Add data to this file such as Divisions, Classes, Premiums, Clubs, etc.
- When you are ready to work on another computer, copy this data file to
the other computer by doing the following:
- Note the location of the data file (see the images at the top of this article for instructions on how to identify your data file name and location).
- Using Windows Explorer, copy this file to a portable media device. For more information on
copying files, see your Windows help manual.
- Take the media to the other computer and copy the file onto the hard
disk of the other computer. You must not attempt to open the data file
in ShoWorks from the portable media device. If you are using a CD, you
must also uncheck the "read only" attribute of the data file after
copying it to the hard disk. To do this, right-click on the file and
select Properties.
- Once the copy of the data file is on the other computer, run ShoWorks
and select File ,
then Open Data File and open the file.
- Repeat the process to move back and fourth between each computer.
Method C - If not using a network and using more than one computer at a
time:
Special Notes:
Financial's such as checks, bills, fees purchased, and payments made, cannot be merged.
Entry Numbers: It is important that all
entries have unique Entry Numbers. Therefore, if one computer creates an
entry and that entry is given an Entry Number of 728, then other computers
creating entries must avoid assigning this same number in new entries they
create. ShoWorks automatically assigns an Entry Number (the next highest
available number) to new entries that are created if the user does not specify
one. In order to prevent multiple computers assigning the same Entry
Number to different entries that are created, it is recommended that each
computer "seed" their Entry Number with a different starting value. For
example, one person may create their first entry with an Entry Number of 1000
while another person may begin with 8000. In this way, one computer will
have subsequent entries numbered with 1001,1002, etc. while the other with 8001,
8002, etc. In this fashion, all entries will have their own unique Entry
Number.
- Install ShoWorks on each computer.
- Choose a computer and let this be considered the "master" computer. All
subsequent computers will be considered "child" computers.
- Update the master file as needed. When other computers that are not on the same network, need to work with data in this file, copy this data file from the master computer to other (child) computer(s). Remember, do not
attempt to open from portable media such as jump drives,
CDs, flash memory sticks, etc. Only use portable media to copy a file to the actual hard drive of the computer (such as to the desktop) and then open the file from this location, not the portable media.
- Update the data on the child computer data file as needed.
- When you wish to merge data files from a child computer, copy the data
file from the child back to the master computer. Do NOT overwrite the
master computer copy but rather place this copy in a different location to
avoid confusion. Run ShoWorks on the master computer and open the master file if it is not already open.
- Click File , then Import, then Import or Merge Records.
Follow the onscreen instructions.
- Repeat this process for each child computer.
Part 2 - sharing your reports
For steps on how to share reports among multiple computers, please refer to
the article:
How to backup reports or changing computers and sharing reports on multiple
computers