Summary
ShoWorks can export all transactions to a standard QuickBooks importing file
(.iif). You can then import this file directly into your QuickBooks
company file

Unlike QuickBooks Pro (the desktop version) the online version of QuickBooks (QuickBooks Online) does not support importing files from third party sources (.IIF). Only the desktop version of QuickBooks is supported.
Important Notes
-
Gladstone does not assume any responsibility for the accuracy of any data
outside of ShoWorks.
-
Once you export data to QuickBooks, there is no intervention or communication
between QuickBooks and ShoWorks (updates to data in one program will not update
the other). Therefore you should only export your ShoWorks data once
- at the end of your fair.
-
Before exporting, you must let ShoWorks write all checks (this
does not mean "printing" them, but rather letting ShoWorks create the records
for the checks). To do this in ShoWorks, select Tools>>Write
Checks.
- Go to the Checks or Bills menu and make sure the "To Print" box is checked for all checks and/or bills that you wish to export.
Steps
-
Run ShoWorks and select File
 then Export, then Export Data
to QuickBooks. ShoWorks will
generate a text file called "ShoWorks QuickBooks.iif".
then Export, then Export Data
to QuickBooks. ShoWorks will
generate a text file called "ShoWorks QuickBooks.iif".
-
Make a backup copy of your QuickBooks file.
-
Create a new 'blank' QuickBooks file that you can temporarily work with to see
how items are imported.
-
In QuickBooks, select File > Utilities > Import > .IIF
Files...
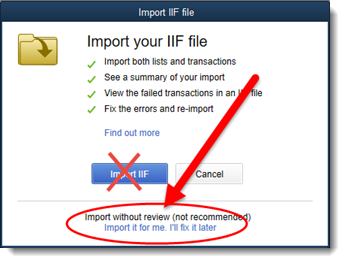
- For QuickBooks 2018 and older, click the "Import IIF" button. For QuickBooks 2019 and newer, do not click the "Import IIF", but instead click "Import it for me. I'll fix it later" link at the bottom of the Window:
-
Locate the "ShoWorks QuickBooks.iif" file that ShoWorks generated (it is
usually in the C:\Program Files\ShoWorks 20xx\System folder).
-
Click "Import". The import process may take several minutes.
-
You may want to turn on Class tracking for a more thorough reporting option.
QuickBooks terms what ShoWorks calls "Divisions" as QuickBooks's "Classes".
Turn on Class tracking in QuickBooks by selecting Edit>>Preferences, then
"Accounting", then click the "Company Preferences" tab. Place a check in the
"Use class tracking" box (do not check the "Prompt to assign classes" box).
Problems?
-
Run the Tools > Financial Inspector prior to exporting to identify financial discrepancies.
-
A buyer cannot have the exact same spelling as an exhibitor. If you receive the message You can't change the type of a name or add duplicate name, this indicates that a buyer and exhibitor share the same name. Change the buyer name to something different (such as adding a letter at the end of their name), then generate the QuickBooks export file again and try the import again.